Кодирование
V=R+256*B+65536*G
Раскодирование
R=V & 0xFF;
B=(V >> 8) & 0xFF;
G=(V >> 16) & 0xFF
mysensors
-
Ivan
- Сообщения: 1473
- Зарегистрирован: Сб окт 12, 2013 11:03 pm
- Благодарил (а): 49 раз
- Поблагодарили: 327 раз
Re: mysensors
Linux, Raspberry PI, MySensors
Connect: http://connect.smartliving.ru/profile/53
Мои проекты: http://smartliving.ru/profile/4
Connect: http://connect.smartliving.ru/profile/53
Мои проекты: http://smartliving.ru/profile/4
-
Molostov
- Сообщения: 50
- Зарегистрирован: Пт янв 17, 2014 1:47 am
- Откуда: Карпинск, Свердловская область
- Благодарил (а): 135 раз
- Поблагодарили: 12 раз
Re: mysensors
Можно отнять ещё немного вашего времени?
Для понимания попробую немного объяснить, что задумал.
Со стандартным кодом диммера и одним каналом всё работает. Сделал в меню слайдер и выключатель. Кроме этого есть объект Dimmer со свойствами Brightness и Status. Через MqTT привязал слайдер к Brightness и выключатель к Status. Всё работает замечательно. Яркость выставляется как положено.
После сделал три слайдера и попробовал код на три канала, он почти работает, т.е. на светильник уходят команды как нужно т.е. значения для Node_ID/1/V_DIMMER, Node_ID/2/V_DIMMER, Node_ID/3/V_DIMMER, нода их принимает и выставляет, но нода отчитывается состоянием только Node_ID/3/V_DIMMER и получается замкнутый круг. т.к. в MqTT сделана привязка 1/V_DIMMER - Blue, 2/V_DIMMER - Red, 3/V_DIMMER - Green, то после отчета ноды получаем что, два цвета гаснут, а зелёный выставляется в уровень заданного цвета.
Цвет я выбираю вот этим селектором цвета http://smartliving.ru/forum/viewtopic.p ... &hilit=rgb
Он со своей стороны через код также связан со свойствами BLUE, RED, GREEN. Таким образом с тремя переменными работать удобнее, потому что их можно задать напрямую.
-
Ivan
- Сообщения: 1473
- Зарегистрирован: Сб окт 12, 2013 11:03 pm
- Благодарил (а): 49 раз
- Поблагодарили: 327 раз
Re: mysensors
Посмотрев код я понял что вы не правильно делаете callbackmessage
Вам нужно сделать его одной функцией и по message.sensor определять к какому сенсору идёт обращение.
Один работает потому что вы gw.begin() повторили 3 раза.
Вам нужно сделать его одной функцией и по message.sensor определять к какому сенсору идёт обращение.
Один работает потому что вы gw.begin() повторили 3 раза.
Код: Выделить всё
gw.begin( incomingMessag );

void incomingMessage(const MyMessage &message) {
  if (message.type == V_LIGHT || message.type == V_DIMMER) {
    switch(message.sesnor){
       case 1:
         incomingMessage_B(message);
         break;
       case 2:
         incomingMessage_R(message);
         break;
       case 3:
         incomingMessage_G(message);
         break;
    }
  }
}
Linux, Raspberry PI, MySensors
Connect: http://connect.smartliving.ru/profile/53
Мои проекты: http://smartliving.ru/profile/4
Connect: http://connect.smartliving.ru/profile/53
Мои проекты: http://smartliving.ru/profile/4
-
Molostov
- Сообщения: 50
- Зарегистрирован: Пт янв 17, 2014 1:47 am
- Откуда: Карпинск, Свердловская область
- Благодарил (а): 135 раз
- Поблагодарили: 12 раз
Re: mysensors
Проковырялся вечер, но функцию switch case заставить работать не смог, переписал через if else. Получился вот такой код
Работает, но появилась другая задача.
Все каналы привязаны каждый к своему слайдеру. Red и Green каналы выставляются и работают,
а вот Blue канал работает только при задании значения от 51 до 100 и сразу выставляется в полную мощность, т.е. 100.
Все слайдеры имеют одинаковые настройки Куда копать ума не приложу, может есть у кого-нибудь мысли?
СпойлерПоказать
Код: Выделить всё
/***
 * This program is free software; you can redistribute it and/or
 * modify it under the terms of the GNU General Public License
 * version 2 as published by the Free Software Foundation.
 *
 * DESCRIPTION
 * This sketch provides a Dimmable LED Light using PWM and based Henrik Ekblad
 * <henrik.ekblad@gmail.com> Vera Arduino Sensor project.
 * Developed by Bruce Lacey, inspired by Hek's MySensor's example sketches.
 *
 * The circuit uses a MOSFET for Pulse-Wave-Modulation to dim the attached LED or LED strip.
 * The MOSFET Gate pin is connected to Arduino pin 3 (LED_PIN), the MOSFET Drain pin is connected
 * to the LED negative terminal and the MOSFET Source pin is connected to ground.
 *
 * This sketch is extensible to support more than one MOSFET/PWM dimmer per circuit.
 *
 * REVISION HISTORY
 * Version 1.0 - February 15, 2014 - Bruce Lacey
 * Version 1.1 - August 13, 2014 - Converted to 1.4 (hek)
 *
 ***/
#define SN "MultiDimmableLED"
#define SV "1.2"

#include <MySensor.h>
#include <SPI.h>

#define LED_BLUE 4      // Arduino pin attached to MOSFET Gate pin
#define LED_RED 5
#define LED_GREEN 6

#define FADE_DELAY 10  // Delay in ms for each percentage fade up/down (10ms = 1s full-range dim)

MySensor gw(9,10);

static int currentLevel_B = 0;
static int currentLevel_R = 0;
static int currentLevel_G = 0;
#define incomingMessage_B;
#define incomingMessage_R;
#define incomingMessage_G;

// Current dim level...
MyMessage dimmerMsg_B(1, V_DIMMER);
MyMessage lightMsg_B(1, V_LIGHT);

MyMessage dimmerMsg_R(2, V_DIMMER);
MyMessage lightMsg_R(2, V_LIGHT);

MyMessage dimmerMsg_G(3, V_DIMMER);
MyMessage lightMsg_G(3, V_LIGHT);

/***
 * Dimmable LED initialization method
 */
void setup()
{
  Serial.println( SN );
  gw.begin( incomingMessage );
  // Register the LED Dimmable Light with the gateway
  gw.present( 1, S_DIMMER );
  gw.present( 2, S_DIMMER );
  gw.present( 3, S_DIMMER );

  gw.sendSketchInfo(SN, SV);
  // Pull the gateway's current dim level - restore light level upon sendor node power-up
  gw.request( 1, V_DIMMER );
  gw.request( 2, V_DIMMER );
  gw.request( 3, V_DIMMER );

}

/***
 *  Dimmable LED main processing loop
 */
void loop()
{
  gw.process();
}

void incomingMessage(const MyMessage &message) {
  if (message.type == V_LIGHT || message.type == V_DIMMER) {
if ((message.sensor) == 1) {
   incomingMessage_B(message);
  //  Retrieve the power or dim level from the incoming request message
    int requestedLevel_B = atoi ( message.data );
    // Adjust incoming level if this is a V_LIGHT variable update [0 == off, 1 == on]
    requestedLevel_B *= ( message.type == V_LIGHT ? 100 : 1 );

    // Clip incoming level to valid range of 0 to 100
    requestedLevel_B = requestedLevel_B > 100 ? 100 : requestedLevel_B;
    requestedLevel_B = requestedLevel_B < 0   ? 0   : requestedLevel_B;
   Serial.println (requestedLevel_B);
    fadeToLevel_B( requestedLevel_B );

    // Inform the gateway of the current DimmableLED's SwitchPower1 and LoadLevelStatus value...
    gw.send(lightMsg_B.set(currentLevel_B > 0 ? 1 : 0));

    // hek comment: Is this really nessesary?
    gw.send(dimmerMsg_B.set(currentLevel_B));
}
if ((message.sensor) == 2) {
   incomingMessage_R(message);
    //  Retrieve the power or dim level from the incoming request message
    Serial.println ("Red");
    int requestedLevel_R = atoi ( message.data );

    // Adjust incoming level if this is a V_LIGHT variable update [0 == off, 1 == on]
    requestedLevel_R *= ( message.type == V_LIGHT ? 100 : 1 );

    // Clip incoming level to valid range of 0 to 100
    requestedLevel_R = requestedLevel_R > 100 ? 100 : requestedLevel_R;
    requestedLevel_R = requestedLevel_R < 0   ? 0   : requestedLevel_R;

    fadeToLevel_R( requestedLevel_R );

    // Inform the gateway of the current DimmableLED's SwitchPower1 and LoadLevelStatus value...
    gw.send(lightMsg_R.set(currentLevel_R > 0 ? 1 : 0));

    // hek comment: Is this really nessesary?
    gw.send(dimmerMsg_R.set(currentLevel_R));
   }

if ((message.sensor) == 3) {
    incomingMessage_G(message);
    //  Retrieve the power or dim level from the incoming request message
    Serial.println ("Green");
    int requestedLevel_G = atoi ( message.data );

    // Adjust incoming level if this is a V_LIGHT variable update [0 == off, 1 == on]
    requestedLevel_G *= ( message.type == V_LIGHT ? 100 : 1 );

    // Clip incoming level to valid range of 0 to 100
    requestedLevel_G = requestedLevel_G > 100 ? 100 : requestedLevel_G;
    requestedLevel_G = requestedLevel_G < 0   ? 0   : requestedLevel_G;

    fadeToLevel_G( requestedLevel_G );

    // Inform the gateway of the current DimmableLED's SwitchPower1 and LoadLevelStatus value...
    gw.send(lightMsg_G.set(currentLevel_G > 0 ? 1 : 0));
    // hek comment: Is this really nessesary?
    gw.send(dimmerMsg_G.set(currentLevel_G));}
   }
}

/***
 *  This method provides a graceful fade up/down effect
 */
void fadeToLevel_G( int toLevel_G ) {

  int delta = ( toLevel_G - currentLevel_G ) < 0 ? -1 : 1;

  while ( currentLevel_G != toLevel_G ) {
    currentLevel_G += delta;
    analogWrite( LED_GREEN, (int)(currentLevel_G / 100. * 255) );
    delay( FADE_DELAY );
  }
}

/***
 *  This method provides a graceful fade up/down effect
 */
void fadeToLevel_R( int toLevel_R ) {

  int delta = ( toLevel_R - currentLevel_R ) < 0 ? -1 : 1;

  while ( currentLevel_R != toLevel_R ) {
    currentLevel_R += delta;
    analogWrite( LED_RED, (int) (currentLevel_R / 100. * 255) );
    delay( FADE_DELAY );
  }
}

void fadeToLevel_B( int toLevel_B ) {

  int delta = ( toLevel_B - currentLevel_B ) < 0 ? -1 : 1;

  while ( currentLevel_B != toLevel_B ) {
    currentLevel_B += delta;
    analogWrite( LED_BLUE, (int)(currentLevel_B / 100. * 255) );
    delay( FADE_DELAY );
  }
}
Все каналы привязаны каждый к своему слайдеру.
СпойлерПоказать
а вот Blue канал работает только при задании значения от 51 до 100 и сразу выставляется в полную мощность, т.е. 100.
Все слайдеры имеют одинаковые настройки
СпойлерПоказать
Последний раз редактировалось Molostov Вс янв 18, 2015 3:38 am, всего редактировалось 1 раз.
-
Molostov
- Сообщения: 50
- Зарегистрирован: Пт янв 17, 2014 1:47 am
- Откуда: Карпинск, Свердловская область
- Благодарил (а): 135 раз
- Поблагодарили: 12 раз
Re: mysensors
Отвечу сам себе, надо учить мат часть. Я подключал ленту к Arduino Nano к пинам 4,5,6, а у неё пинами с шим могут быть только 3, 5, 6, 9, 10, и 11. Переделал скетч и изменил синий пин на 3, остальные оставил как было и всё заработало как положено.
На всякий случай прикладываю финальный скетч.
На всякий случай прикладываю финальный скетч.
СпойлерПоказать
Код: Выделить всё
/***
 * This program is free software; you can redistribute it and/or
 * modify it under the terms of the GNU General Public License
 * version 2 as published by the Free Software Foundation.
 *
 * DESCRIPTION
 * This sketch provides a Dimmable LED Light using PWM and based Henrik Ekblad
 * <henrik.ekblad@gmail.com> Vera Arduino Sensor project.
 * Developed by Bruce Lacey, inspired by Hek's MySensor's example sketches.
 *
 * The circuit uses a MOSFET for Pulse-Wave-Modulation to dim the attached LED or LED strip.
 * The MOSFET Gate pin is connected to Arduino pin 3 (LED_PIN), the MOSFET Drain pin is connected
 * to the LED negative terminal and the MOSFET Source pin is connected to ground.
 *
 * This sketch is extensible to support more than one MOSFET/PWM dimmer per circuit.
 *
 * REVISION HISTORY
 * Version 1.0 - February 15, 2014 - Bruce Lacey
 * Version 1.1 - August 13, 2014 - Converted to 1.4 (hek)
 *
 ***/
#define SN "MultiDimmableLED"
#define SV "1.2"

#include <MySensor.h>
#include <SPI.h>

#define LED_BLUE 3      // Arduino pin attached to MOSFET Gate pin
#define LED_RED 5
#define LED_GREEN 6

#define FADE_DELAY 10  // Delay in ms for each percentage fade up/down (10ms = 1s full-range dim)

MySensor gw(9,10);

static int currentLevel_B = 0;
static int currentLevel_R = 0;
static int currentLevel_G = 0;
#define incomingMessage_B;
#define incomingMessage_R;
#define incomingMessage_G;

// Current dim level...
MyMessage dimmerMsg_B(1, V_DIMMER);
MyMessage lightMsg_B(1, V_LIGHT);

MyMessage dimmerMsg_R(2, V_DIMMER);
MyMessage lightMsg_R(2, V_LIGHT);

MyMessage dimmerMsg_G(3, V_DIMMER);
MyMessage lightMsg_G(3, V_LIGHT);

/***
 * Dimmable LED initialization method
 */
void setup()
{
  Serial.println( SN );
  gw.begin( incomingMessage );
  // Register the LED Dimmable Light with the gateway
  gw.present( 1, S_DIMMER );
  gw.present( 2, S_DIMMER );
  gw.present( 3, S_DIMMER );

  gw.sendSketchInfo(SN, SV);
  // Pull the gateway's current dim level - restore light level upon sendor node power-up
  gw.request( 1, V_DIMMER );
  gw.request( 2, V_DIMMER );
  gw.request( 3, V_DIMMER );

}

/***
 *  Dimmable LED main processing loop
 */
void loop()
{
  gw.process();
}

void incomingMessage(const MyMessage &message) {
  if (message.type == V_LIGHT || message.type == V_DIMMER) {
if ((message.sensor) == 1) {
   incomingMessage_B(message);
  //  Retrieve the power or dim level from the incoming request message
    int requestedLevel_B = atoi ( message.data );
    // Adjust incoming level if this is a V_LIGHT variable update [0 == off, 1 == on]
    requestedLevel_B *= ( message.type == V_LIGHT ? 100 : 1 );

    // Clip incoming level to valid range of 0 to 100
    requestedLevel_B = requestedLevel_B > 100 ? 100 : requestedLevel_B;
    requestedLevel_B = requestedLevel_B < 0   ? 0   : requestedLevel_B;
   Serial.println (requestedLevel_B);
    fadeToLevel_B( requestedLevel_B );

    // Inform the gateway of the current DimmableLED's SwitchPower1 and LoadLevelStatus value...
    gw.send(lightMsg_B.set(currentLevel_B > 0 ? 1 : 0));

    // hek comment: Is this really nessesary?
    gw.send(dimmerMsg_B.set(currentLevel_B));
}
if ((message.sensor) == 2) {
   incomingMessage_R(message);
    //  Retrieve the power or dim level from the incoming request message
    Serial.println ("Red");
    int requestedLevel_R = atoi ( message.data );

    // Adjust incoming level if this is a V_LIGHT variable update [0 == off, 1 == on]
    requestedLevel_R *= ( message.type == V_LIGHT ? 100 : 1 );

    // Clip incoming level to valid range of 0 to 100
    requestedLevel_R = requestedLevel_R > 100 ? 100 : requestedLevel_R;
    requestedLevel_R = requestedLevel_R < 0   ? 0   : requestedLevel_R;

    fadeToLevel_R( requestedLevel_R );

    // Inform the gateway of the current DimmableLED's SwitchPower1 and LoadLevelStatus value...
    gw.send(lightMsg_R.set(currentLevel_R > 0 ? 1 : 0));

    // hek comment: Is this really nessesary?
    gw.send(dimmerMsg_R.set(currentLevel_R));
   }

if ((message.sensor) == 3) {
    incomingMessage_G(message);
    //  Retrieve the power or dim level from the incoming request message
    Serial.println ("Green");
    int requestedLevel_G = atoi ( message.data );

    // Adjust incoming level if this is a V_LIGHT variable update [0 == off, 1 == on]
    requestedLevel_G *= ( message.type == V_LIGHT ? 100 : 1 );

    // Clip incoming level to valid range of 0 to 100
    requestedLevel_G = requestedLevel_G > 100 ? 100 : requestedLevel_G;
    requestedLevel_G = requestedLevel_G < 0   ? 0   : requestedLevel_G;

    fadeToLevel_G( requestedLevel_G );

    // Inform the gateway of the current DimmableLED's SwitchPower1 and LoadLevelStatus value...
    gw.send(lightMsg_G.set(currentLevel_G > 0 ? 1 : 0));
    // hek comment: Is this really nessesary?
    gw.send(dimmerMsg_G.set(currentLevel_G));}
   }
}

/***
 *  This method provides a graceful fade up/down effect
 */
void fadeToLevel_G( int toLevel_G ) {

  int delta = ( toLevel_G - currentLevel_G ) < 0 ? -1 : 1;

  while ( currentLevel_G != toLevel_G ) {
    currentLevel_G += delta;
    analogWrite( LED_GREEN, (int)(currentLevel_G / 100. * 255) );
    delay( FADE_DELAY );
  }
}

/***
 *  This method provides a graceful fade up/down effect
 */
void fadeToLevel_R( int toLevel_R ) {

  int delta = ( toLevel_R - currentLevel_R ) < 0 ? -1 : 1;

  while ( currentLevel_R != toLevel_R ) {
    currentLevel_R += delta;
    analogWrite( LED_RED, (int) (currentLevel_R / 100. * 255) );
    delay( FADE_DELAY );
  }
}

void fadeToLevel_B( int toLevel_B ) {

  int delta = ( toLevel_B - currentLevel_B ) < 0 ? -1 : 1;

  while ( currentLevel_B != toLevel_B ) {
    currentLevel_B += delta;
    analogWrite( LED_BLUE, (int)(currentLevel_B / 100. * 255) );
    delay( FADE_DELAY );
  }
}
-
Ivan
- Сообщения: 1473
- Зарегистрирован: Сб окт 12, 2013 11:03 pm
- Благодарил (а): 49 раз
- Поблагодарили: 327 раз
Re: mysensors
Наконец добрался до счётчика днём. Описание как сделать выше.
Вот картинка как я подключил геркон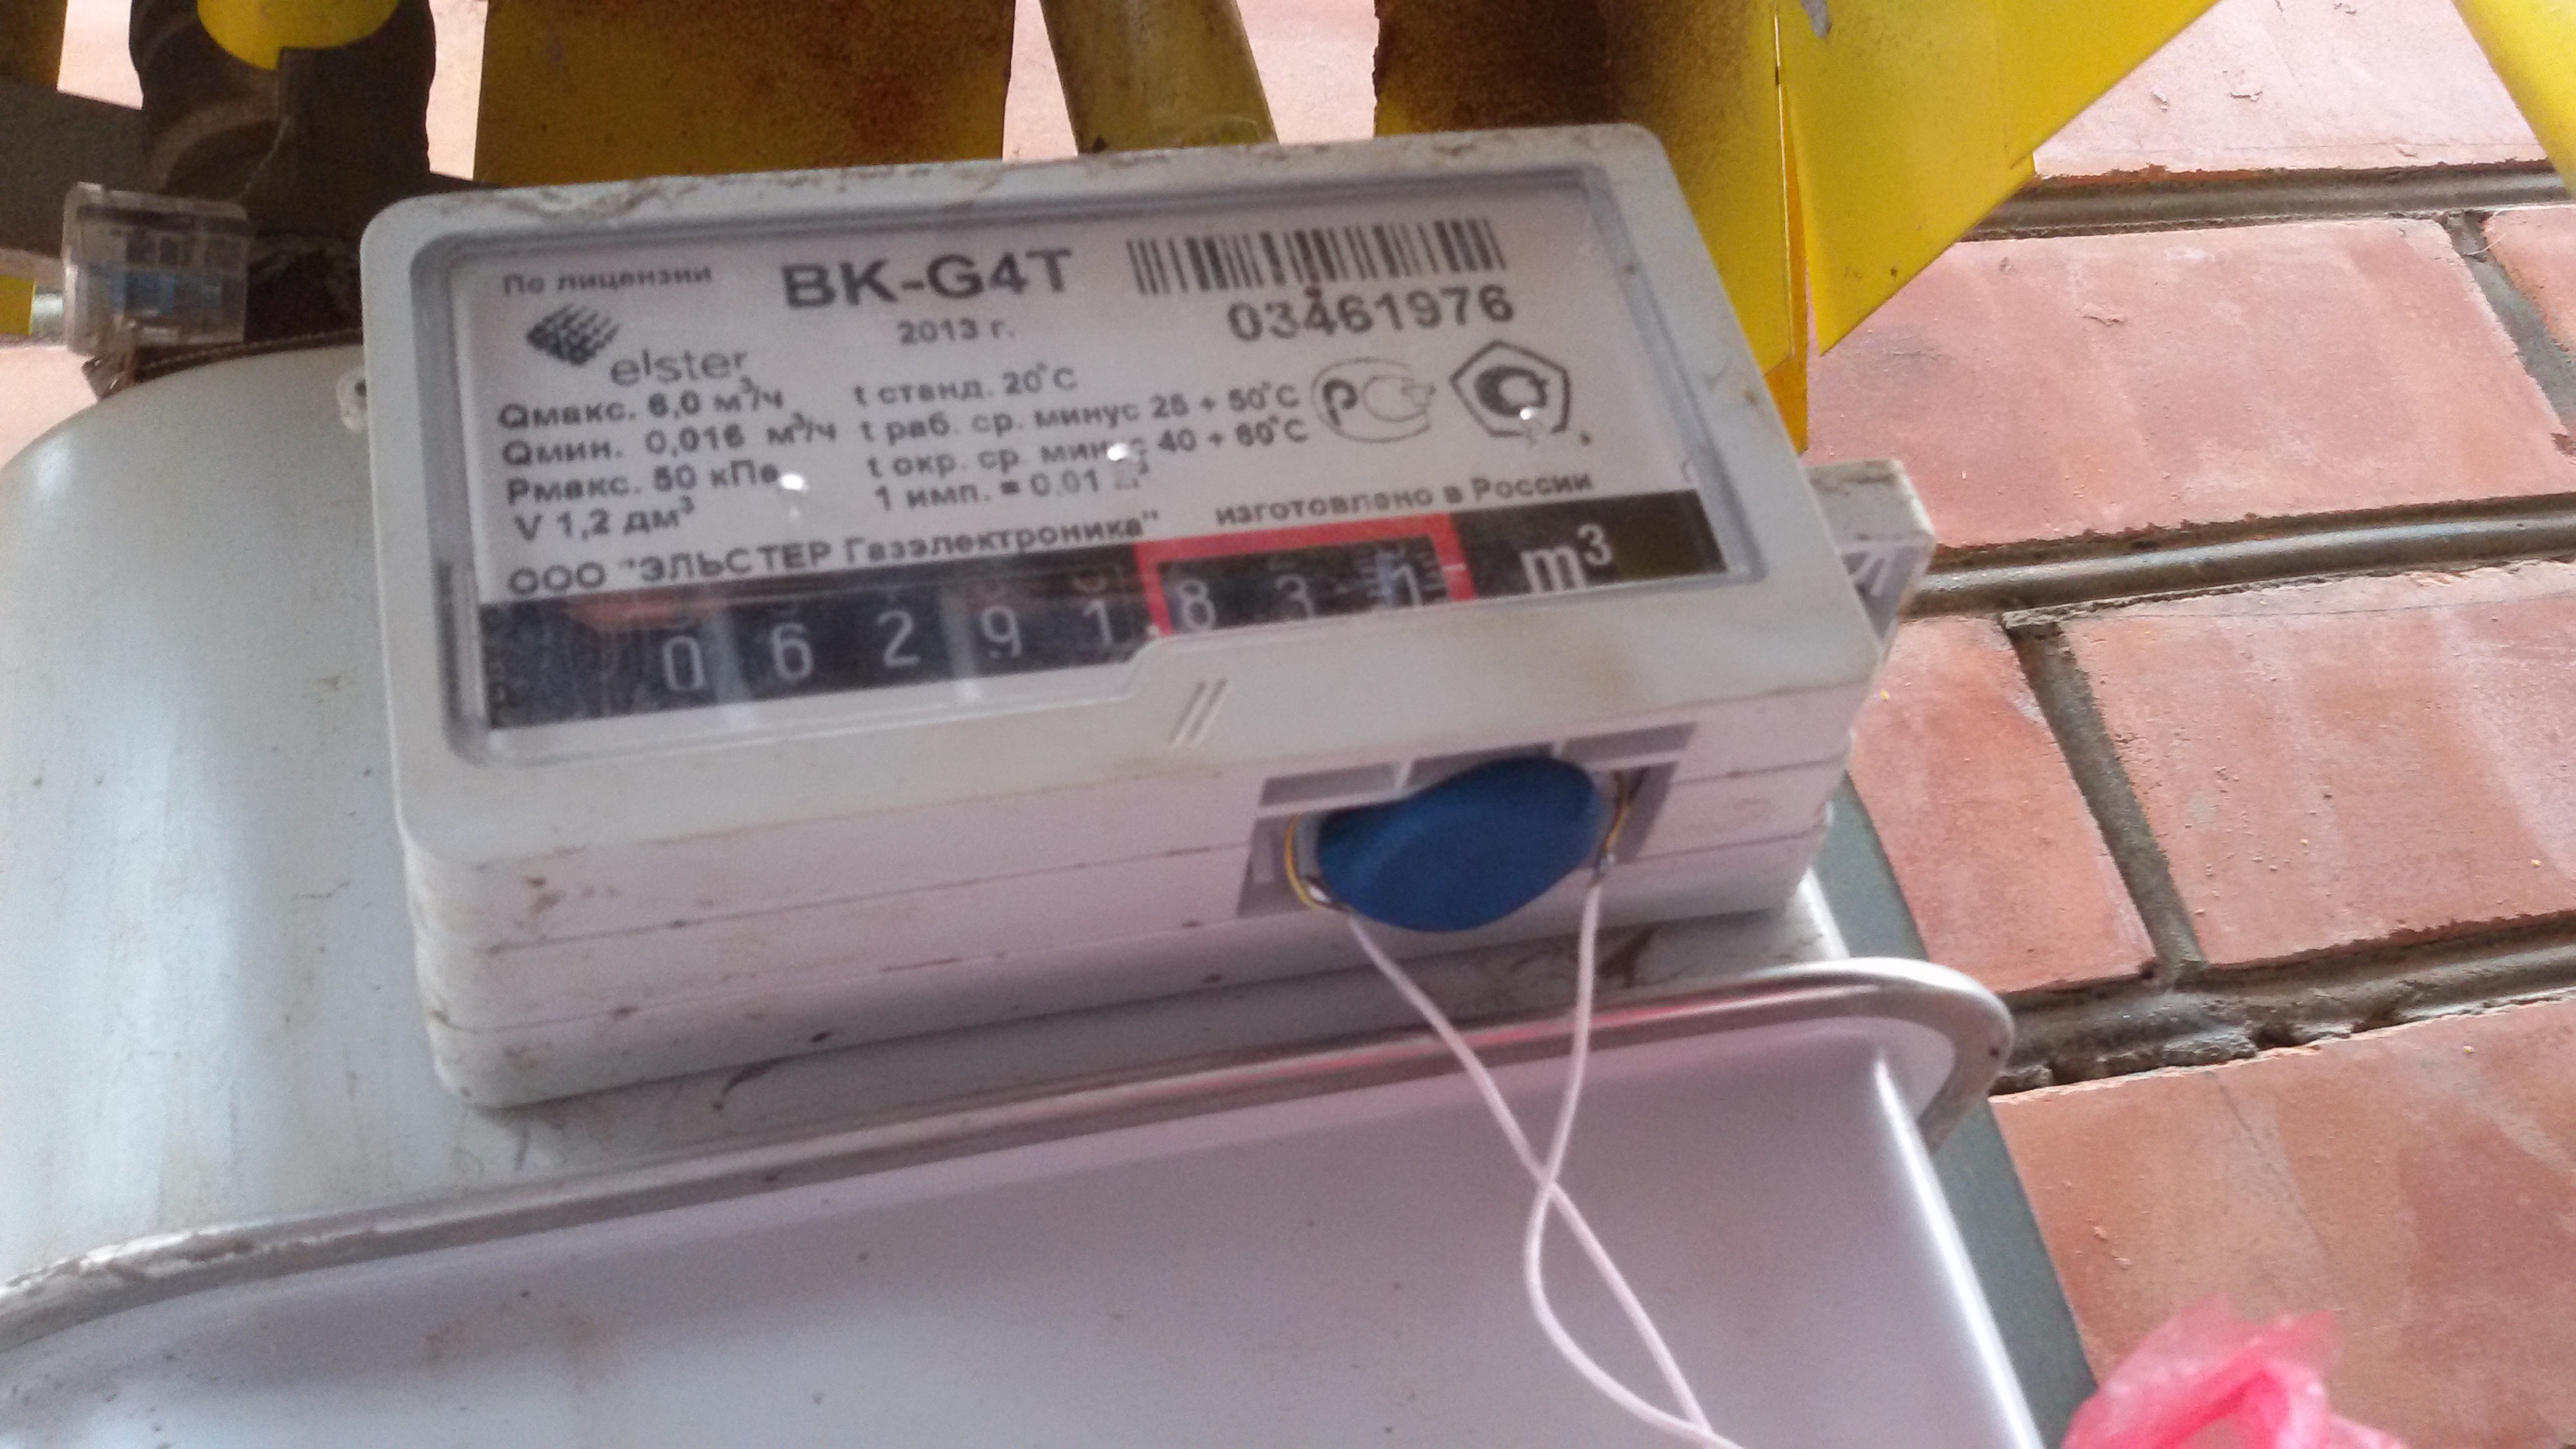
Вот картинка как я подключил геркон
СпойлерПоказать
Linux, Raspberry PI, MySensors
Connect: http://connect.smartliving.ru/profile/53
Мои проекты: http://smartliving.ru/profile/4
Connect: http://connect.smartliving.ru/profile/53
Мои проекты: http://smartliving.ru/profile/4
-
Ivan
- Сообщения: 1473
- Зарегистрирован: Сб окт 12, 2013 11:03 pm
- Благодарил (а): 49 раз
- Поблагодарили: 327 раз
Re: mysensors
Делюсь радостью. В последней версии исправили глюк Mesh сетей. Теперь работает возврат информации датчику после запроса у Gate через репитеры
Наконец я запустил тестовую плату считывания воды.
И считыватель газового счётчика перестал пропадать (иногда мог не присылать данные по 18 часов).
Ещё новость. Запустили в производство мини плату для Mysesnor http://www.mysensors.org/hardware/micro
Но боюсь что я не дождусь их и буду делать свои. А значит можно будет делать компактные устройства на батарейках (Собираюсь сделать небольшое количество на продажу)
- Рейтинг: 1.16%
Linux, Raspberry PI, MySensors
Connect: http://connect.smartliving.ru/profile/53
Мои проекты: http://smartliving.ru/profile/4
Connect: http://connect.smartliving.ru/profile/53
Мои проекты: http://smartliving.ru/profile/4
-
Ivan
- Сообщения: 1473
- Зарегистрирован: Сб окт 12, 2013 11:03 pm
- Благодарил (а): 49 раз
- Поблагодарили: 327 раз
Re: mysensors
- Рейтинг: 1.16%
Linux, Raspberry PI, MySensors
Connect: http://connect.smartliving.ru/profile/53
Мои проекты: http://smartliving.ru/profile/4
Connect: http://connect.smartliving.ru/profile/53
Мои проекты: http://smartliving.ru/profile/4
-
LutsenkoDenis
- Сообщения: 521
- Зарегистрирован: Вс апр 07, 2013 9:30 pm
- Откуда: Moscow
- Благодарил (а): 2 раза
- Поблагодарили: 58 раз
- Контактная информация:
Re: mysensors
Имхо, несколько поторопились... Не всем посетителям mySensors,org будут понятны Скриншоты на русском языке. В остальном... с почином!
Очень понравилась подача системы Jeedom.
Правда при попытке более детального осмотра их сайта упираешься во французский язык, но даже бегло потыкав мышкой по сайту понимаешь насколько все продумано.
Также понравился их маркет приложений. Ели сравнивать с нашим маркетом, то кроме приложений можно установить или просто скачать пользовательские темы, скрипты, иконки, и кучу всего. Нам бы такое тоже было бы здорово сделать.
- За это сообщение автора LutsenkoDenis поблагодарил:
- Alien (Ср фев 11, 2015 11:24 am)
- Рейтинг: 1.16%
________________________________________________________
Majordomo (GitHub) на HP Microserver Gen8. OS Debian Stretch
Majordomo (GitHub) на HP Microserver Gen8. OS Debian Stretch